
Should coaches create courses? The short answer is: yes. In this article, we will show you how while giving you a brief overview of FreshLMS.
Most starting coaches are busy building their brand and getting their first clients. So, the question of building a course seems overwhelming for two reasons:
First, until you have build out your area of expertise and found your voice, the question often is what do I package into a course?
The second question we often hear from coaches is how to provide a course technically on their website or via other means.
We Will Share The Essentials of Course Creation (No Fluff)
In this post we will take you through the process of planning a course. We will then show you a tool that will allow you to build a course and allow thousands of students to access the course with a few clicks.
Watch the video about “Course Creation for Coaches” where we also showcase FreshLMS, an affordable and intuitive solution to help you.
Before You Create Your Course
Collect In-Demand Topics
Think about the key challenges your clients face repeatedly. If a topic comes up again and again, the chances are great that there is a demanding audience who will want to hear a solution. This is where you identify common themes and collect keywords from your conversations to give you ideas for content.
Sort Your Topics
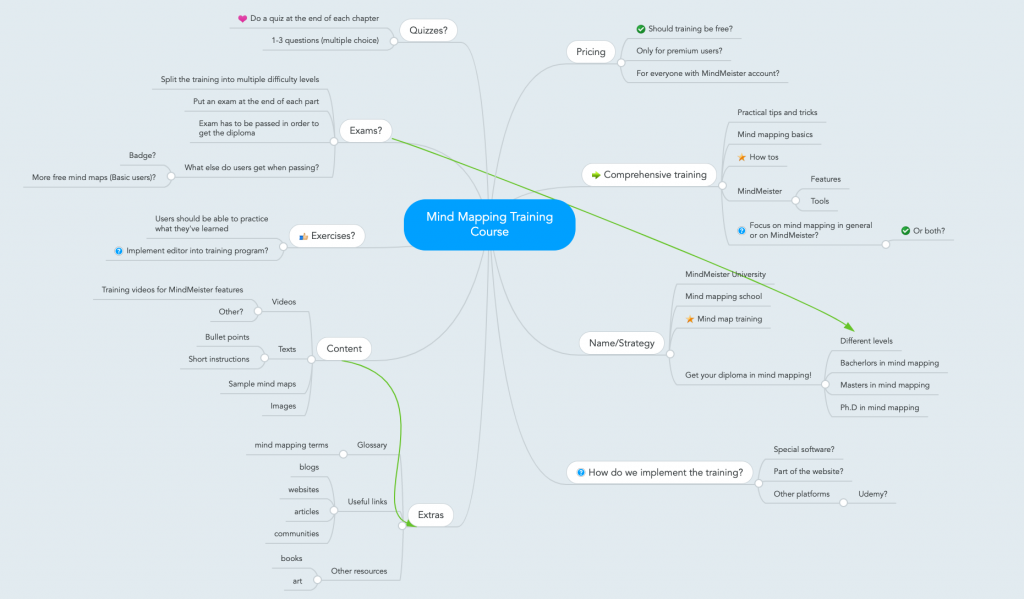
Next, you begin to sort your topics. We recommend mind mapping – a methodology used in ideation/brainstorming to add, cluster and sort ideas. A great free tool to use for this is MindMeister.
The result is a “mind map” – which is a visualization of the topics you can teach on.
Add Content Ideas
Once you have your topic outline, begin to brainstorm ideas of how you could best present the topic to your students. This is where you think about how you may visualize or demonstrate something. This could be a picture, a chart, it could be a live demonstration, or a mix of media.
Quality Check Your Content Ideas
Think about what would be the best way to explain a concept to your students. With each idea for content you are developing for each topic, ask yourself, “What do I want my students to do/remember/or change once they have watched this module?”

Then check if your content would help them and consider planning reinforcements. Reinforcements help students to remember and apply what they have just learned. These could include:
- a chapter quiz
- a handout
- a worksheet/exercise
- a learning game
- sharing a video response
- etc.
Develop Your Course Materials
Creating Your Course
You have so many options available to create a course these days! Not every course requires you to be on camera. Think about what you want students to learn and then decide how this learning is best delivered.
For example, to teach how to use Microsoft Excel, seeing you on camera is unlikely to help your students. They need to see the application in action to follow along.
Use Simple Course Creation Tools
This list is full of assets you can use to look professional and quickly create your course materials:
- Microsoft PowerPoint or Apple’s Keynote (to create presentations)
- Canva (to create stunning presentations that look professionally designed)
- Envato Market (for design templates)
- InVideo (to easily create videos)
- FreshLMS (to build your course, collect payment and provide students access)
Publish Your Course
We like simple tools that are intuitive. You can use a platform like FreshLMS to build and host your course.
Add a New Course in FreshLMS
First, give your course a catchy title (try Co-Schedule’s free headline analyzer!) and add a brief description that states what challenges you solve with your course. Upload a course image that matches and begin to create your course (you can get free images at Pixabay or Unsplash).
Create Modules, Chapters and Add Course Content

Next, you will add your course modules and chapters. A module is the summary of chapters. So think of this in terms of parts of a book with different chapters to cover a group of distinct topics.
This is where you can simply add your prepared content by copying text over, adding or embedding a video you have created and adding a quiz to check your student’s understanding.
As you can see, this will give you all the basic things you need to set up your course.
Create a (FreshLMS) Landing Page to Promote Your Course
To sell your course, you need to have a page to share with students what the course is about and why it’s worth taking. You will do this under “Landing Page.”
Next, you will head over to the “Pricing” tab to set your prices and connect your PayPal or Stripe account.
The “Domain Manager” is a great feature that allows you to make it look like the course is hosted on your own website. FreshLMS explains the simple steps to set this up so your students see your URL in the browser and not FreshLMS. This helps avoid confusion and mistrust and will make you look like a pro!
You can create certificates to reward your students.
And to make sure your course becomes successful, you can even turn your students into promoters of your course by using the “Affiliates” feature.
Lastly, Fresh LMS integrates with popular tools like Zoom, Hubspot, Mailchimp and others.
Check it out and let us know what you think!
Share Your Course With Us!
If you have published a course, make sure to add a comment with a link to your course so others can see it.
